Getting Started Guide 🚀
A quick rundown of how to put up your first e-commerce plan in 3 easy steps.
It’s hard to learn new platforms. It is perhaps even more difficult to integrate them into your daily life. Our goal is for you to effortlessly incorporate Glowtify into your routine. This article will walk you through the basics of creating your first e-commerce marketing plan.
Psst! 👀 The five easy steps of your e-commerce marketing plan:
- Step 1 – Name your store 🎨
- Step 2 – Connect to Google Analytics & Facebook 🔗
- Step 3 – Activate your 1st recommendation 👩🔬
- Step 4 – Schedule your 1st promotion 📅
- Step 5 – Share your plan 🥳
A simple, step-by-step process ✅
This is a simple process to implement! Just follow the steps below to get started:
Step 1 – Name your store 🎨
The goal of your e-commerce plan is to guide your team in a way that reflects your company values and shows productivity goals. You can create your own tasks from scratch, or choose from the ai-powered recommendations we’ve created for you.
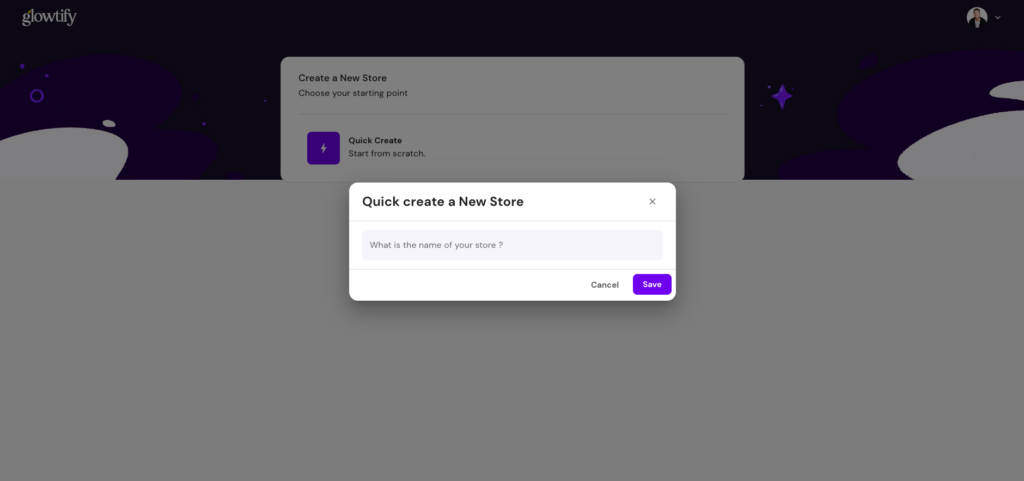
Have fun with it! You can be as creative as you want. 🎨
Login: Make sure you have already Signed In. Once you’ve created your account, log in to your dashboard.
To begin, you should rename your workspace. You have the option to name it after your store or select any name you prefer.
add goals to the plan. All you have to do is use the e-commerce marketing plan generator in the left menu. You can :
- Align with your business vision: Make sure to align your team by letting them know what the goal of the plan is.
- Select 3 Definition Lenses: Choose from the bank of over 12 ready-to-use lenses.
- Speed up the process using the Glowtify builder: Go from a blank page to a well-crafted plan. Glowtify ingeniously identifies the most important key results related to your 3 goals.
Step 2 – Connect to Google Analytics & Facebook 🔗
After assigning a name to your e-commerce workspace, the next step is to establish connections with Google Analytics and Facebook. This will enable us to gain a comprehensive understanding of your business and unleash its full potential.
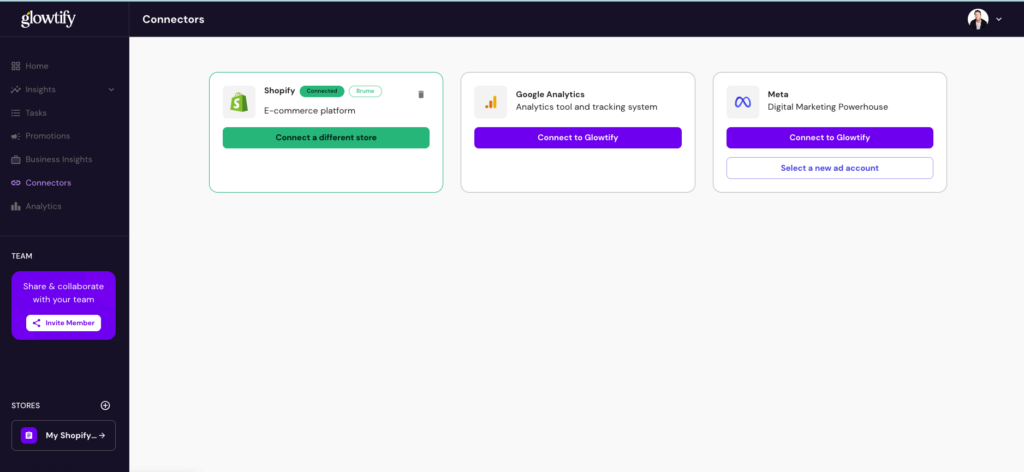
🙂 If you don’t have a Google Analytics Account and need assistance, please contact our team and we will create one for you.
Ask support to create Google Analytics account
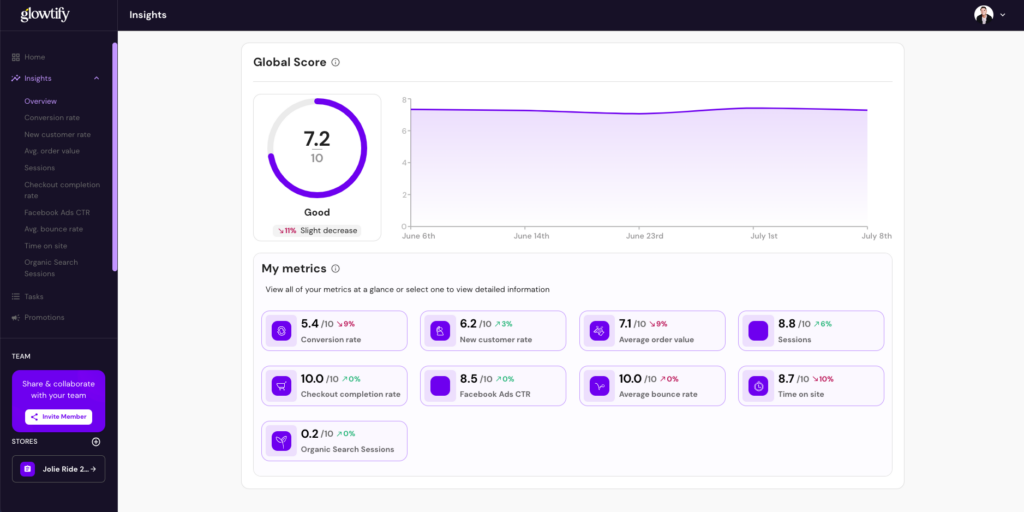
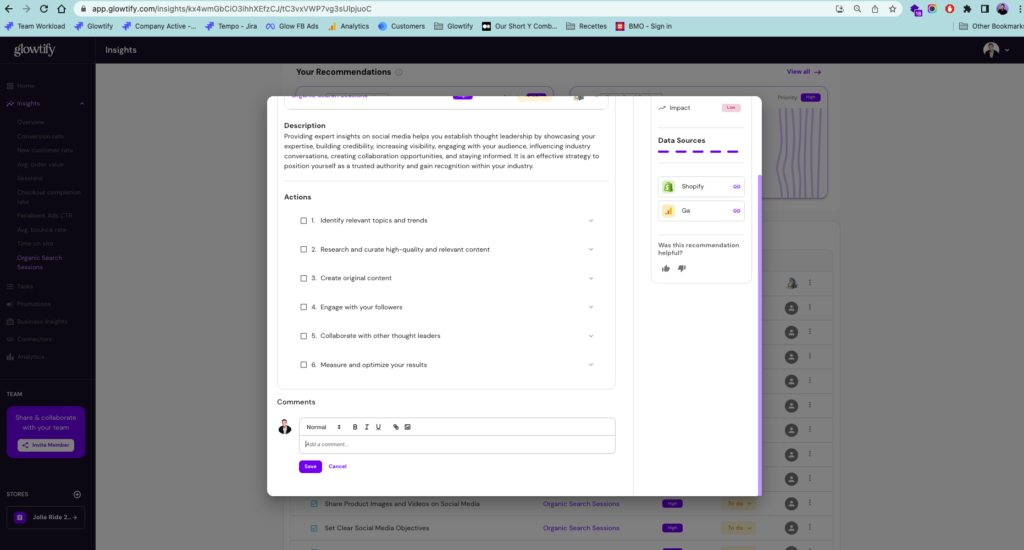
Step 3 – Activate your 1st recommendation 👩🔬
Once your Glowtify app is connected to Shopify, Google Analytics & Facebook, we are ready to guide you with the full understanding of your business.
- Visite the Insights page to see how you perform on key metrics
- Click on the lower score out of 10 to discover what to do to improve this score.
- Activate your 1st recommendation
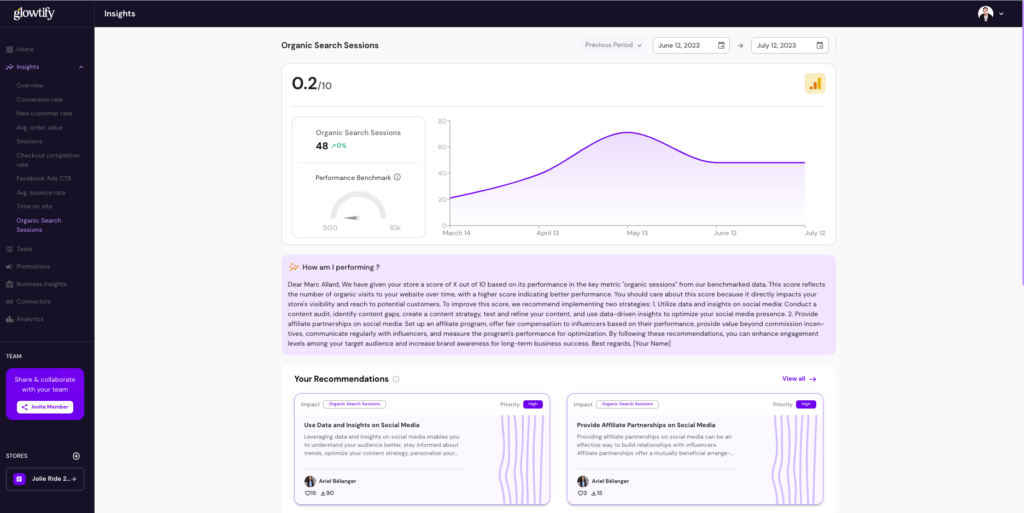
Use the Comment section to attach any documents or subtasks related to this initiative. This format can help your employee better understand what they need to do to complete the initiative.
We strongly encourage you to take your time when activating your first Recommendation. Always understand the capacity of your team. It’s probably worth looking at the goals that you give your team or that they set for themselves. You need to know how long a certain job needs to be done.
Remember that assigning deadlines for each individual task can have a disruptive effect on your team’s motivation and engagement. This constant pressure and added stress usually leads to delays, poor results and burnout.
There’s a much better approach to consider here that will allow you to achieve your goals while building your team’s confidence and leaving a little bit of subjectivity to encourage them to push themselves to achieve exceptional results.
Step 4 – Schedule your 1st promotion 📅
Go to the promotion page. Streamline Your eCommerce campaigns & optimize your planning process for success. Designed to empower eCommerce managers by providing them with a comprehensive list of tasks and actions required for a well-prepared promotion. It streamlines the planning process by seamlessly coordinating activities with agencies, employees, and freelancers, ensuring a successful and coordinated campaign execution.

Step 5 – Share your plan 🥳
Now that you have your e-commerce plan in place, you are ready to finalize and activate it.🥳
Once you have completed the 4 points of this list, you can share your plan! When you share your plan, your co-workers will receive a notification with your store Name in their invitation email.
If your team feels like it’s constantly under stress or overworked while continuing to fail to deliver the results you expect, chances are you’re placing expectations on them that they’re not. able to satisfy
Your job as a marketer is to set achievable goals, empower your teams, and build their confidence by allowing them to do their job at their own pace. You need to create an environment of trust and psychological safety.
Empowering your team means granting their independence – they need to feel your trust that they will complete their work in a timely manner while maintaining high quality.
Always refer to your plan to stay focused on what adds real value to your customer.
Congratulation! You now know how to create an e-commerce marketing plan, and prioritize goals, key results, and initiatives. 🥳
Do not worry ! Your first move doesn’t have to be perfect. Use this time to learn what works best for you and build from there. The important thing is to move forward.
If you adapt based on employee feedback and take the time, you’ll become a marketing pro in no time.
